
Making the Most of Mini Stamps - Part One


Deborah and I are swapping days for a few weeks, so she'll be here with her post on Friday.
As we've just had a new collection from Purple Onion which includes a lot of really small individual stamps, I thought's I'd show you a few tricks for making the most of small stamps which can often be overlooked as "not big enough" to be a main focal feature on a card.
Today I'm showing how masking a few together can make a tiny stamp into a focal image. For this one I opted to use 3 of Stacey Yacula's images from Purple Onion Designs - Cecil and Hugh from the brand new birthday themed release and Elm from the Christmas release but his parcel works for birthdays too!
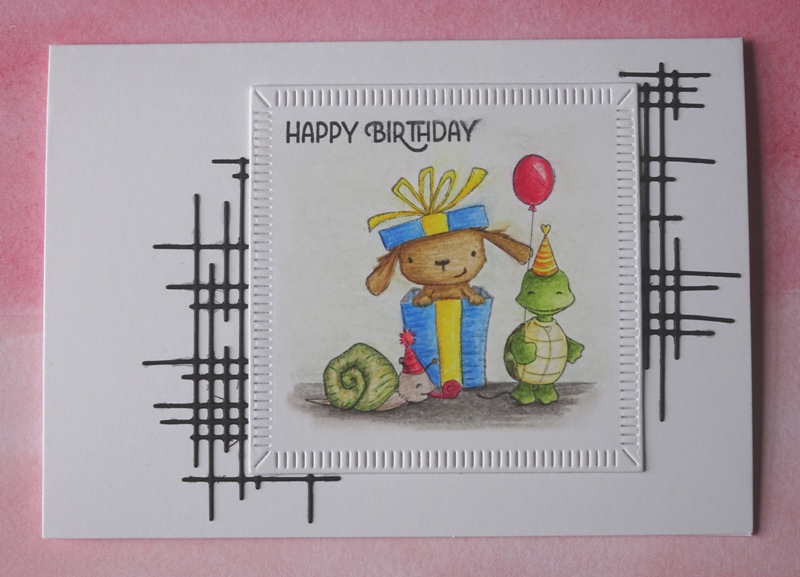
I stamped them first onto masking paper and cut them out. This gives you the ability to arrange your cluster and get the layout how you want it - it can be trickier to do with pure rubber stamps as opposed to clear polymer, but there are some tricks to help you. Once I'd got my cluster how I wanted it, it was then time to stamp the design out fully - remember when stamping a masked scene you work from the front to the back so in this case starting with Hugh the snail. Once he's stamped, apply the mask over the top and stamp Elm in behind him. Because the only part of Cecil that overlaps Elm is the balloon string, there is no need to mask Elm, even though Cecil is in front, you can stamp him directly over the top.
For me to work out where to stamp, I just put my masks in place and drew a light pencil mark to line up with the bottom of each stamp. Alternatively, if you are going to use a lot of solid stamps, then using a jig is a good idea for stamping perfection. My jig is home made - all you need is a sheet of thickish acetate and a few blocks of chunky lego (the chunky stuff for toddlers) which you click together to make an L shape. Then you pop your stamp onto a block, stamp onto the acetate lining your block up in the right angle. Then you place the acetate over your project, get the image exactly where you want it, put your jig in place, remove the acetate and then when you stamp again because the block goes back into the same place in the jig it will be exactly where you want it.
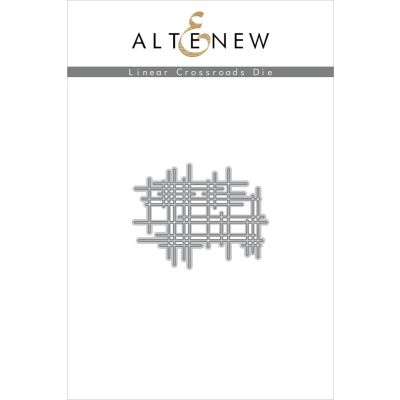
Once you've got your scene coloured - I used pencils for mine and blended the background out to fade away. Trim your shape or cut with a die as I did here - I used one of the crimped squares from the Crimped Notecard Die from The Greetery. I'd used the same card to colour onto as my base card so the whites match but to give some more separate I used the Linear Crossroads die from Altenew, die cut once from black and trimmed into two pieces so I could split it either side of the panel. This again draws focus to the smaller images and suddenly we have a full standard card despite only starting with 3 tiny stamps. Finished with a sentiment from MFT's Stylish Sentiments stamped in black.
I'll be back on Sunday with another technique for making the most of a small image.
Happy Crafting.
Tara
June 8, 2022
|
View: 384
|
Categories: Pencil Colouring, Die Cutting, Masking
|
Tags: Altenew, Purple Onion Designs, The Greetery
|
By: Tara
|
Modify By: Bev at June 8, 2022
About the Author

Related Posts

The blog is back!
February 16, 2020| Posted in Colouring Stamped Images, Copic Colouring, Pencil Colouring, Die Cutting| Admin| 6| 1174
Pottery Crazy
February 17, 2020| Posted in Die Cutting, Stencilling, Stencilling with embossing paste, Special Effects| Admin| 1| 1380

Floral Focus
February 22, 2020| Posted in Colouring Stamped Images, Pencil Colouring, No Line Colouring| Admin| 2| 730
Related Products


Controversial Santas
August 28, 2022

Birthday Forecast
February 14, 2022

Encouraging Leaves
March 15, 2021

Framed Snowdrops
February 22, 2021

Altenew 6th Anniversary Blog Hop Day 4 + Giveaway
April 5, 2020

Postage Collage Christmas Card
October 22, 2024
Overlapping Christmas
October 19, 2024
Stay Cozy, This Or That?
October 17, 2024
Poinsettia Postage Collage with Waffle Flower
October 16, 2024

Whoosh Kites with Colouring Stencils
October 15, 2024