
How to hack a large window slider on the Plane Amazing Die

I fell in love with the Plane Amazing stamp and die set as soon as I saw it - the idea of making my own little sliding window blinds for my cards just had me screaming "yes please!"
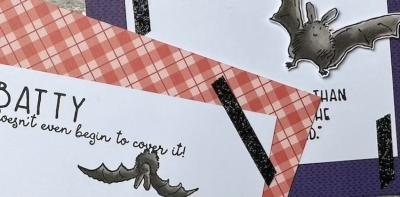
Today I've made a couple of cards using the dies as intended for a couple of friends who are off to Italy for a month (lucky ladies!). It's a REALLY easy interactive die set to use. You cut 3 pieces - a blind, some handles and "window scene" strip - stamp your design onto the strip, fold the blind around it, add some stacked handles so its easy to move and pop it behind your windows. You can cut 3 windows on a portrait card, or 4 on a landscape version. For mine, I dind't do any stamping as I just cut my strip from green, white and red card so it makes the Italian flag when you raise the blinds. You could do this with any flags if they fit the striped themed (as so many do). Its super easy to line them up to as there are dotted score lines on the strip to help you. C9 really did think of everything on this set!. I added some frames around the windows and then stamped sentiments in matching colours (not sure if I liked blue or dark grey better!) to finish the cards.

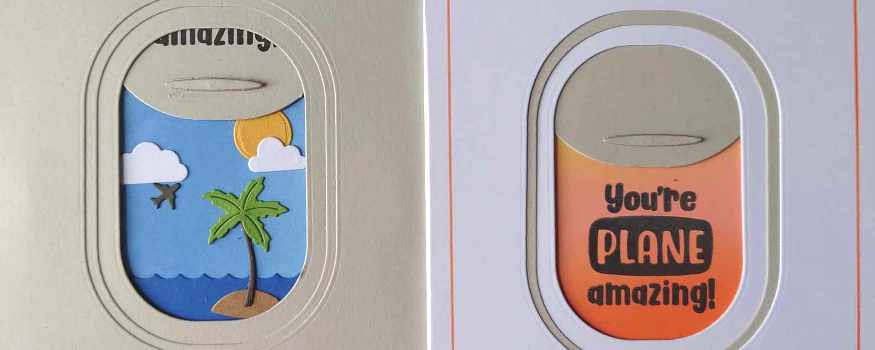
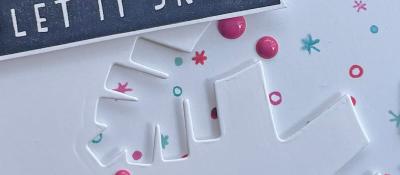
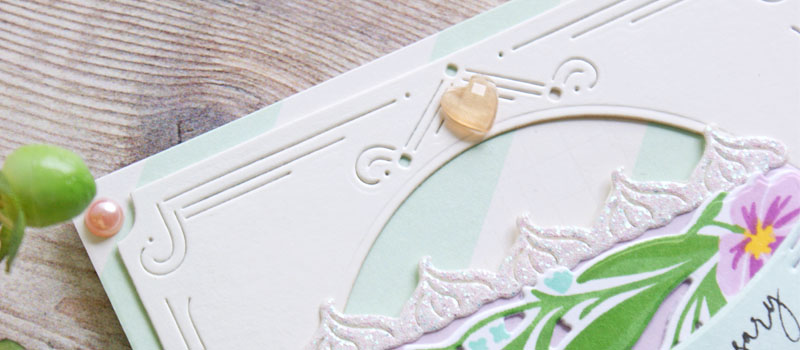
Then I wanted to make a bigger one using the large window dies. But then I hit a snag - there isn't a moving blind which made me sad as I wanted to make another card for our postie who will be moving routes next week and I wanted a bigger card for him. I decided I would have a go at hacking my own blind.....
You can see how I did it fully on YouTube. Essentially you need to move to a larger card (5 x 7 inch) and then create you own slider. Take a piece of card 7 inch across and 3.5 inch high. Scored and 1.5 inch and 4.5 inches and folded and secured behind. This gives you a 3 inch wide slider. Cut a strip of card for your "image" that is 7 inch tall and just less than 3 inch wide (so you slider slides) Use the largest window die and the partial die cutting technique to cut the bottom of your blind and cut the edges off with scissors. Add your handle, slide it over, secure behind your inner window layer and hey presto - a big slider!

I added a stamped sentiment on an ombre background for our postie's card, but you can use the die cuts that come with the die set to create differnent scenes you'd see form a plane window - seascapes as I did below, mountains, trees, desserts. There are a lot of options - you could even use a photo you've taken from a plane window to make it really personal!
Hope that gives you a couple of good ideas to play with to get more from your sets.
NEWS FROM THE STORE
This week we will have:
Waffle Flower Grip Mat and Postage Collage restocks
Some new items from Newton's Nook
A new release from The Greetery
Happy Crafitng!
Tara
Related Posts

Retro Christmas
01/07/2020| Posted in Copic Colouring, Die Cutting, Card Making, Stamped Background, Heat Embossing| 256

Ride the Wave
31/07/2020| Posted in Die Cutting, Stamp Layering| 279
A Winter Scene
23/11/2020| Posted in Colouring Stamped Images, Copic Colouring, Card Making, Interactive Cards, Shaped Cards| 2| 383

Floating On By
26/07/2021| Posted in Copic Colouring, Die Cutting, Ink Blending, Stencilling, sentiment Focal Points| 252


Fall Foliage All Year Round - Part 2
16/12/2021| Posted in Stamping Techniques, Card Making, Fussy Cutting, Stamping, Clean & Simple| 1| 279

Twinkle Twinkle
18/12/2021| Posted in Copic Colouring, Off The Page Projects| 1| 939

Under The Mistletoe
23/12/2021| Posted in Colouring Stamped Images, Copic Colouring, Card Making, Stamping, Clean & Simple| 368
Last Years Christmas Stocking
16/07/2022| Posted in Copic Colouring, Card Making, Fussy Cutting, Patterned Papers, Stamping, Clean & Simple, Clean and Simple (CAS)| 295


Month By Month - Part 1
01/12/2022| Posted in Colouring Stamped Images, Copic Colouring, Die Cutting, Stencilling, Stamped Background, Gift Making| 281
Month By Month - Part 4
22/12/2022| Posted in Die Cutting, Ink Blending, Stencilling, turnabouts, Gift Making, Layering Stencils| 361

Pretty CAS Gift
02/11/2023| Posted in Die Cutting, Ink Blending, Card Making, Clean & Simple, Clean and Simple (CAS)| 269


Snow Much Love
05/12/2023| Posted in Die Cutting, Stamping Techniques, Card Making, Heat Embossing, Clean & Simple| 135
2024 Part Three
21/12/2023| Posted in Ink Blending, Stamping Techniques, Stamp Layering, Stencilling, turnabouts, Gift Making, Masking, mixed media, Wreath Building| 208
Related Products

Controversial Santas
28/08/2022

Birthday Forecast
14/02/2022

Encouraging Leaves
15/03/2021

Framed Snowdrops
22/02/2021

Floral Anniversary Wishes
01/05/2024
Congratulations!
30/04/2024
Flowers - The Language of Love
29/04/2024
Sky High Birthday Balloons and Store News
28/04/2024
Birthday Blossoms
25/04/2024