
Time for Tea with The Greetery Garden Party Release

Morning all!
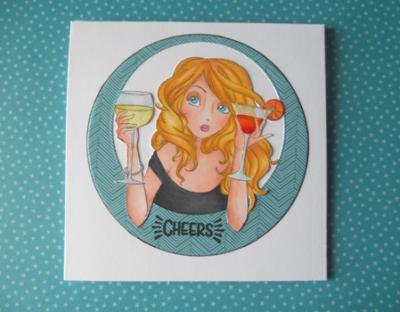
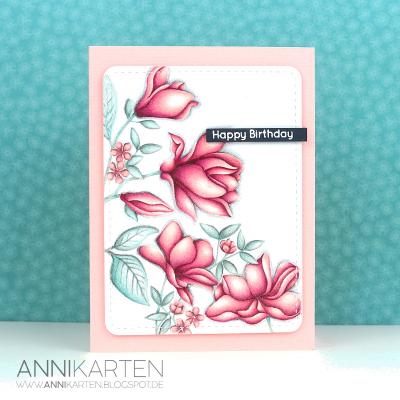
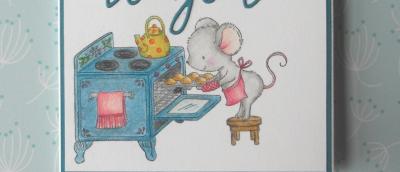
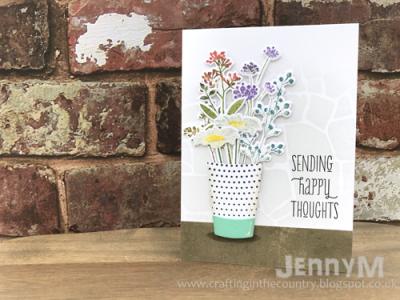
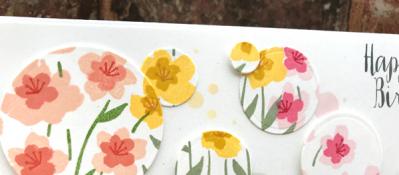
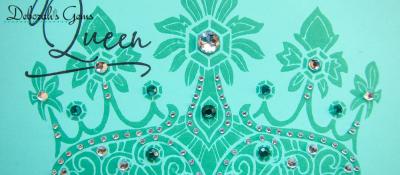
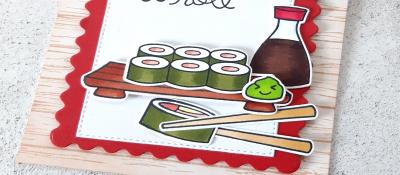
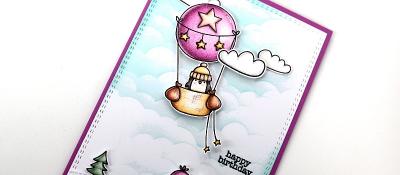
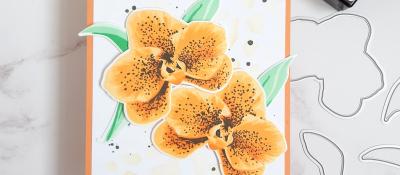
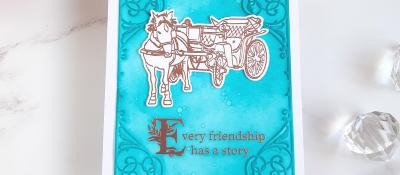
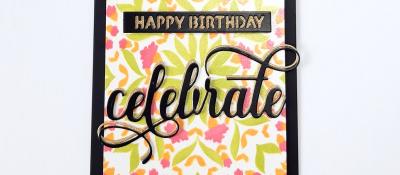
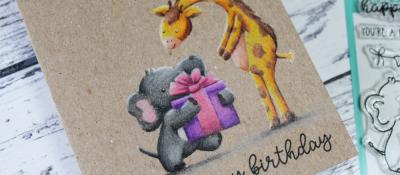
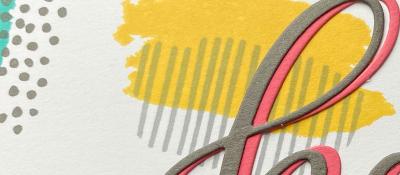
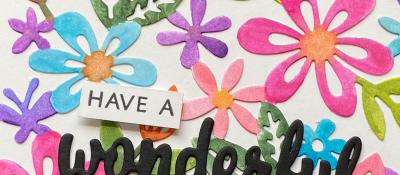
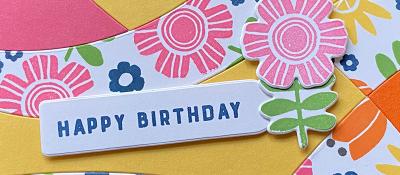
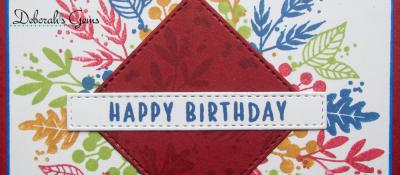
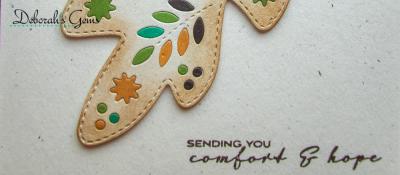
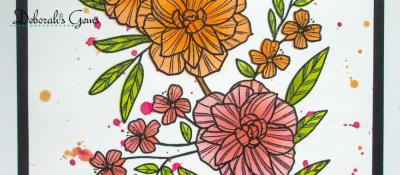
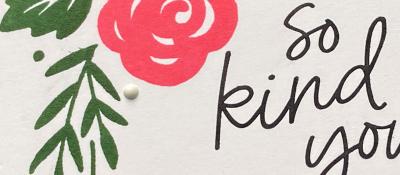
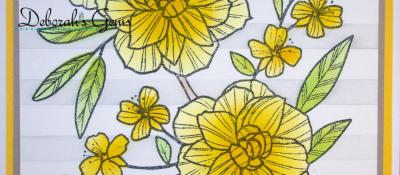
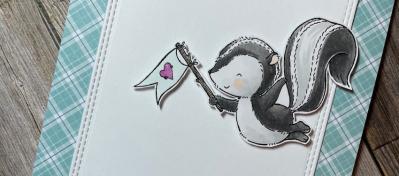
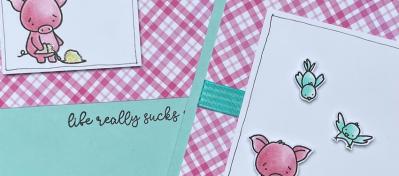
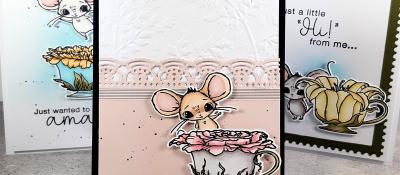
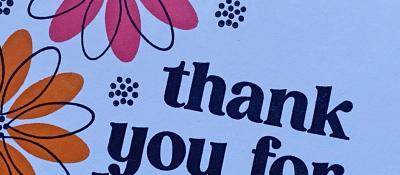
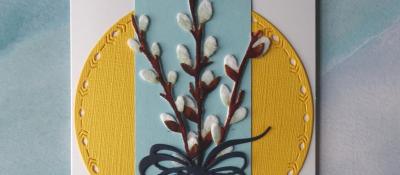
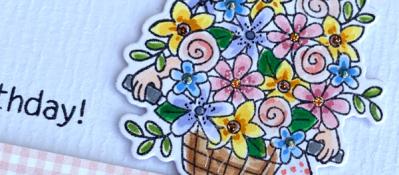
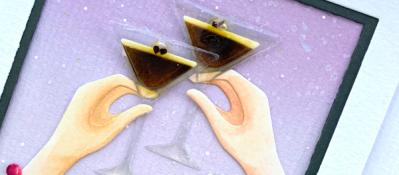
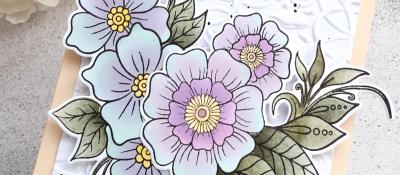
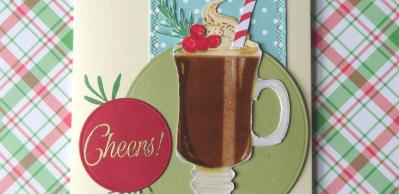
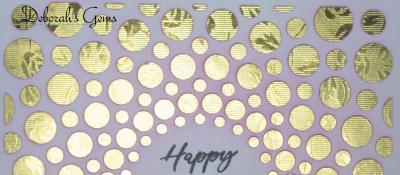
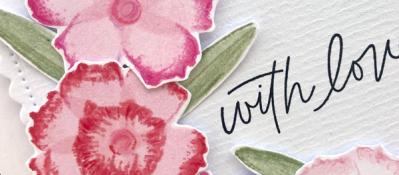
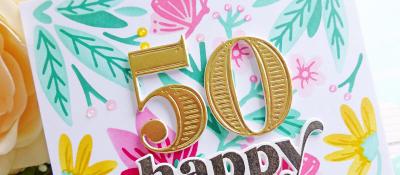
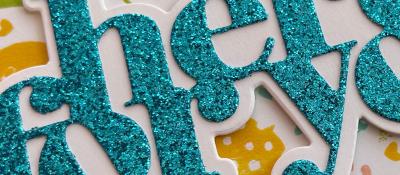
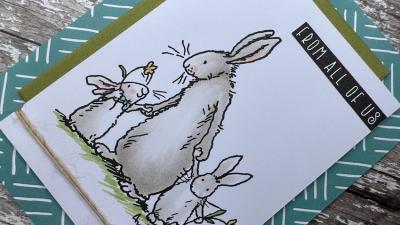
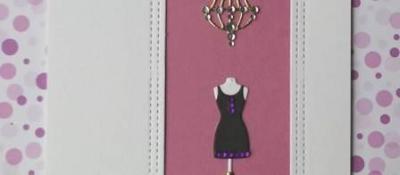
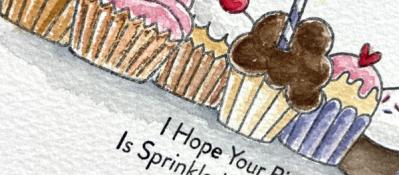
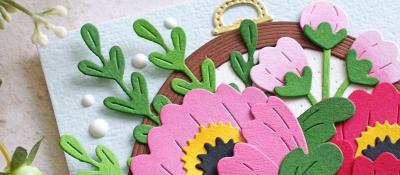
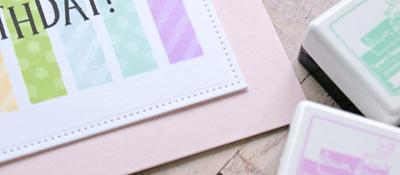
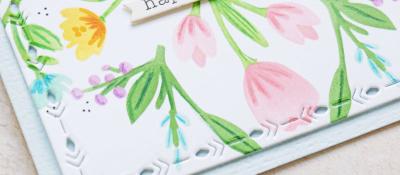
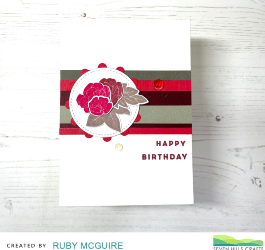
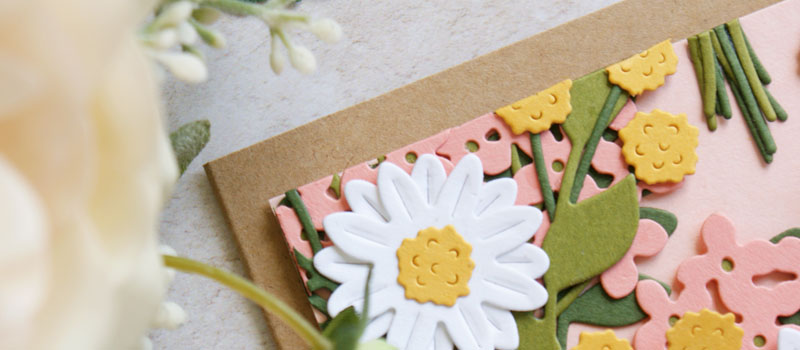
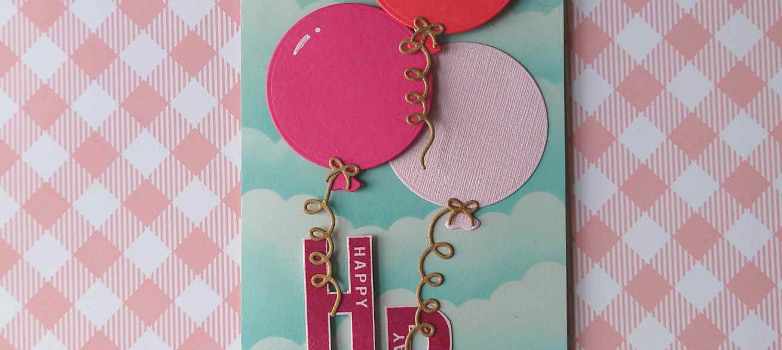
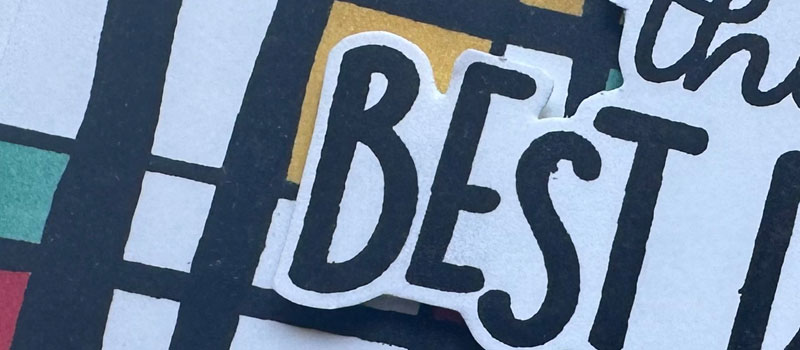
I'm back today with a rather fancy card - even if I say so myself!
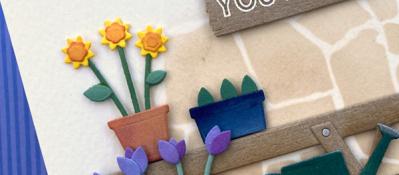
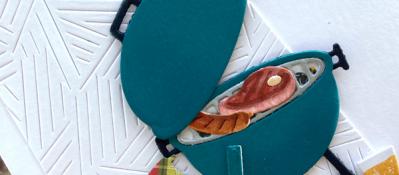
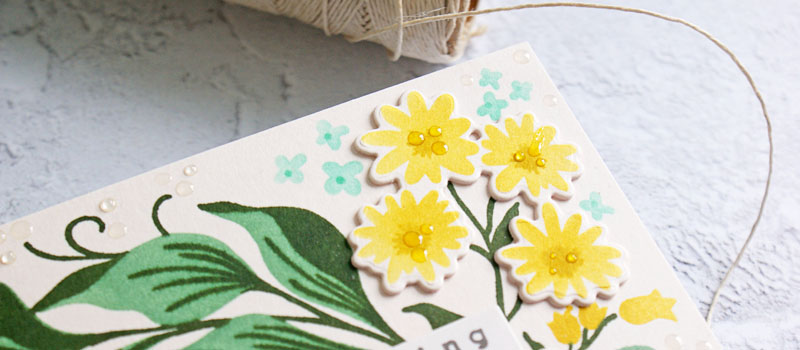
I absolutely loved so many items in the new Garden Party collection from The Greetery, but the must-haves for me were the tea set items!
No doubt I will be picking up more items from this release in due course, but those china patterns and coordinating elements went right to the top of my list.
~~~
As soon as I receive an order of craft supplies, I have a little ritual of cutting all the dies to test them out in my machine before snipping them apart and popping them in their new storage pockets.
So there are several elements from various sets used in today's project, simply because they were all cut and ready to go (and still out on my desk!).
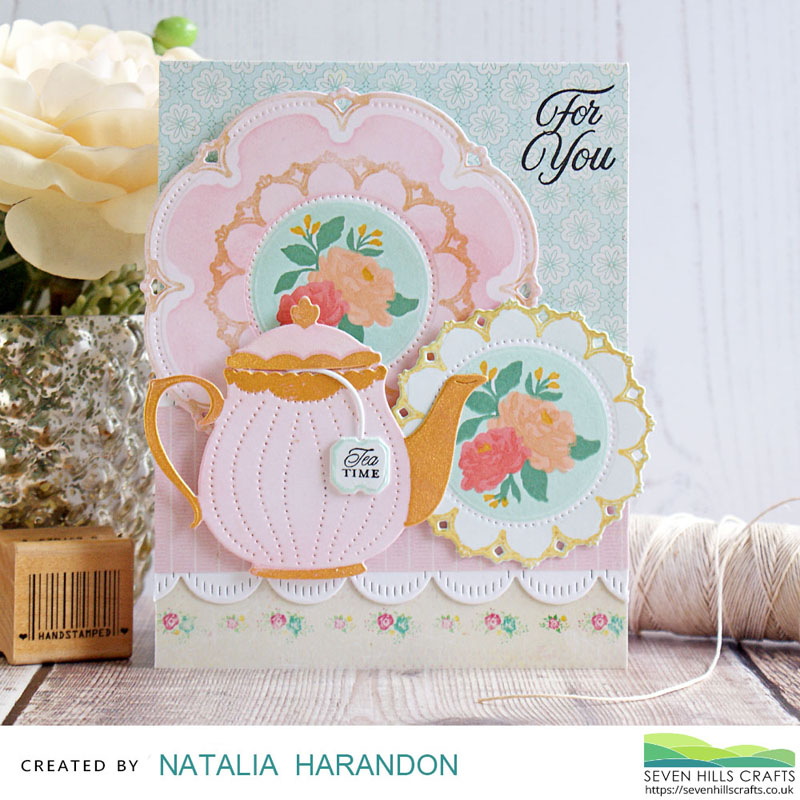
Here are the sets I've used:
-
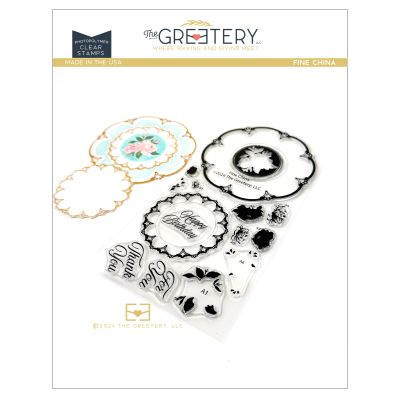
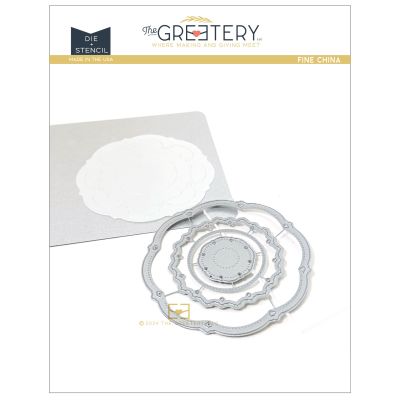
Fine China stamps and Fine China die and stencil
-
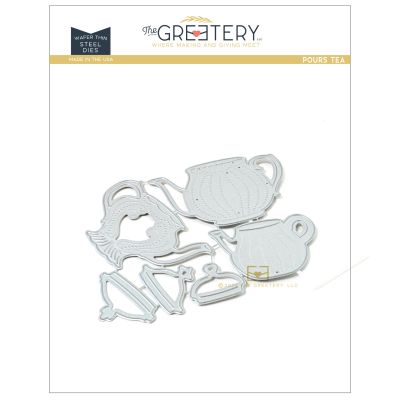
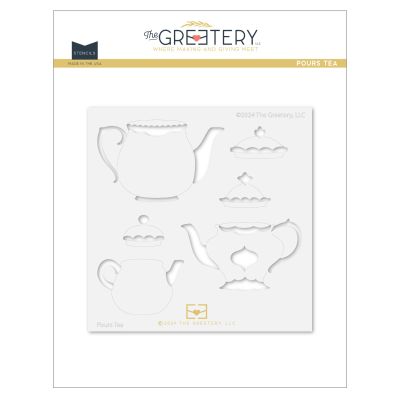
Pours Tea dies and coordinating stencil
-
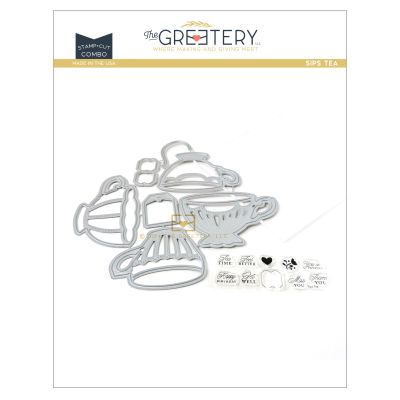
Sips Tea Stamp + Cut combo
-
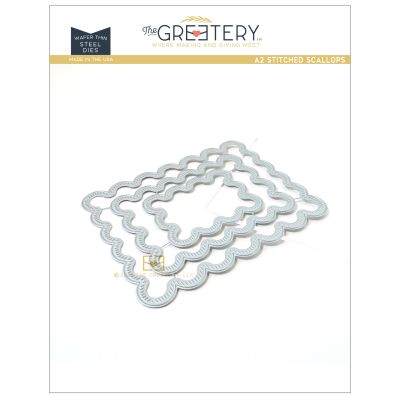
A2 Stitched Scallops
~~~
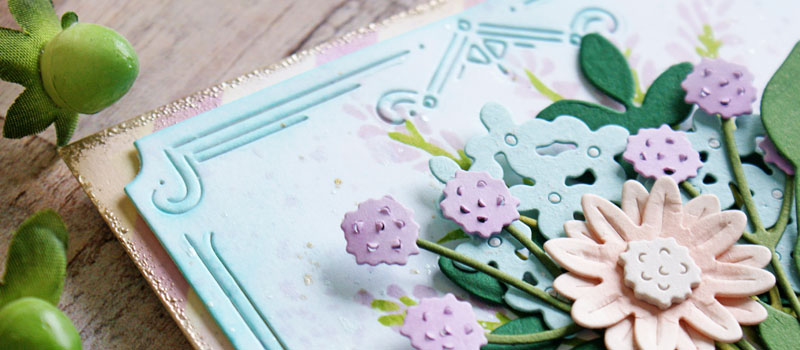
Tip for the Fine China dies: Before snipping the dies apart, run the fused die through your machine with heavy-weight cardstock to create yourself an alignment template. While the pieces are still nestled in the die, stick them all together on the back using some sturdy tape.
Also, while the die is still in one piece, it's a good idea to flip it over and draw a line down the centre with a permanent pen and ruler, marking the top and bottom of the dies for easy reference.
Once you snip the dies apart, you can simply nestle them into the cardstock template you've made and hold them in place with some low-tack tape so they are perfectly aligned when running the various die combinations through your machine. This makes it super easy to ensure the dotted circle die is accurately centred in the middle of the plates.
~~~
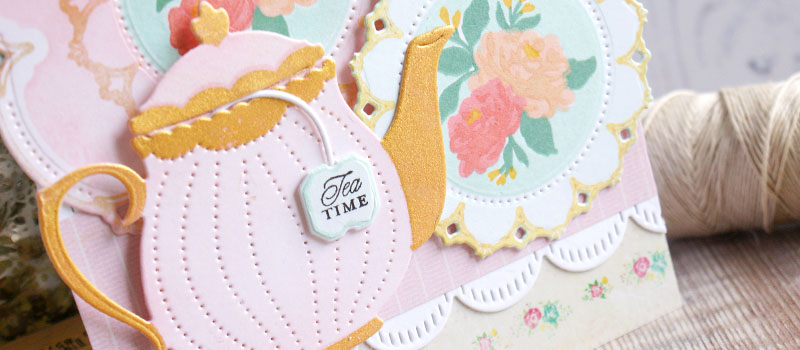
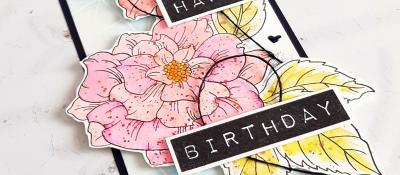
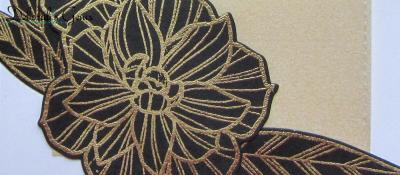
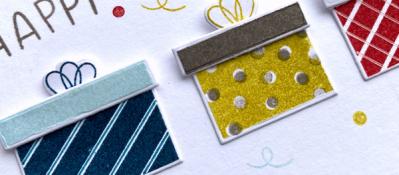
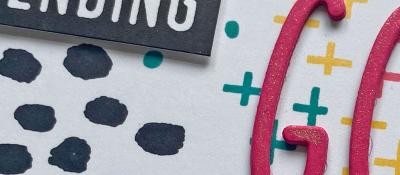
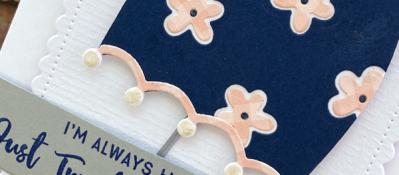
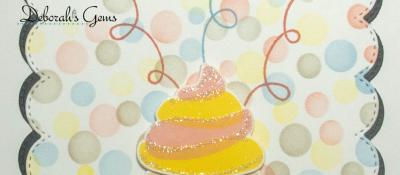
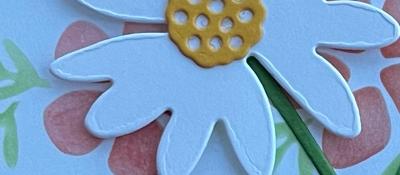
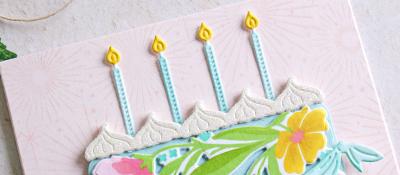
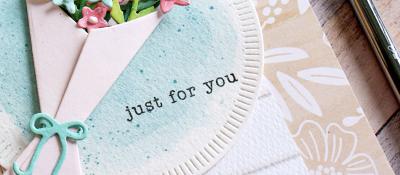
So with all the elements already cut for this card, it was time to get blending, stamping, and adding that gold lustre!
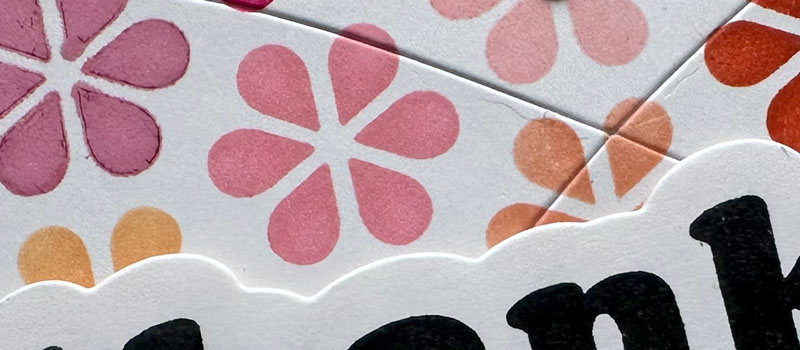
I started out with the Pours Tea teapots, which I blended in a few different pastel shades, one of them being the pink I eventually used on this card.
As someone who doesn't own a foiling system, I was happy to see some tips from Betsy for replicating the lustre of foiling using the coordinating stencils. As luck would have it I still had a refill bottle of Glue Pad ink in my stash (must be 15 years old by now!) and an even older set of Ranger Perfect Pearls (which haven't seen much use until now!), and thankfully one of the shades in that set (Sunflower Sparkle) passes as a fancy gold!
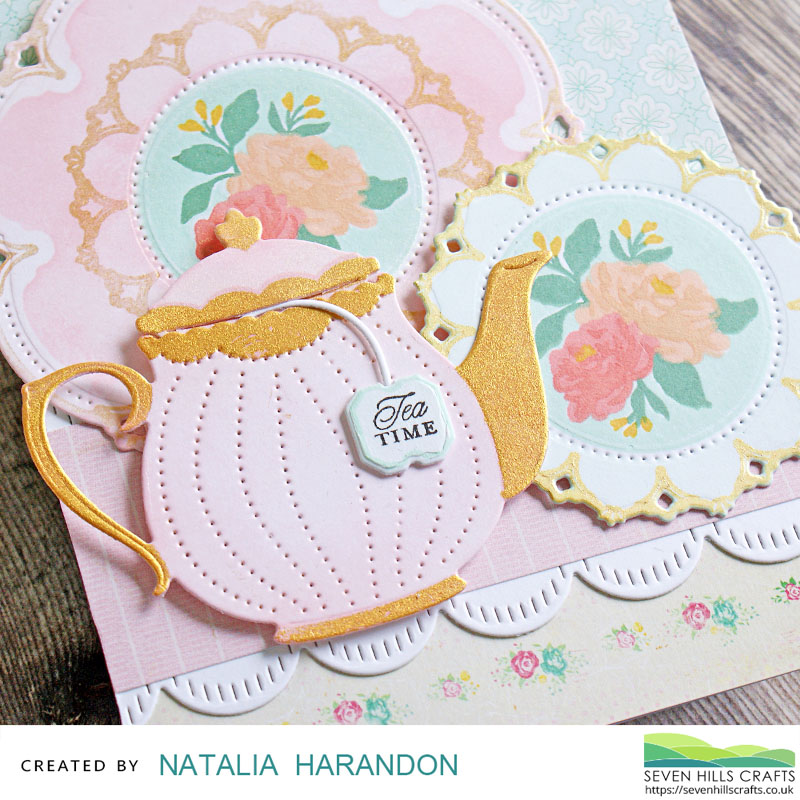
So I am pleased to report, the technique with the Glue Pad ink, finger dauber, and Perfect Pearls was a winner! Thank you Betsy!
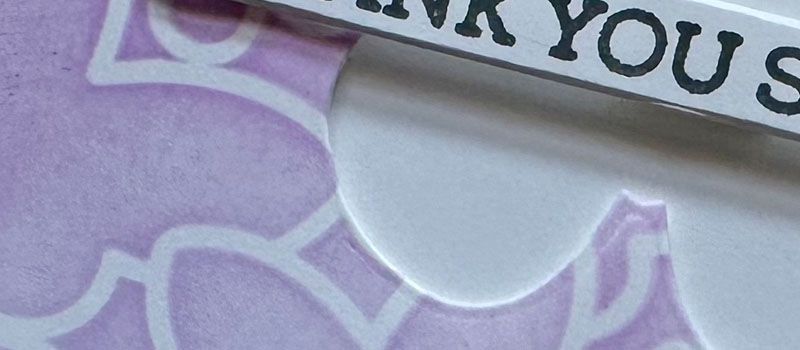
Once I'd stencilled and stamped my Fine China plates, I tested out some different methods of adding gold.
For the biggest plate, I stamped the edge and inner detail in Versamark ink and went over this with Perfect Pearls. This initially looked great, but after handling the finished plate, the powder came off a bit - not a problem for a more vintage, tarnished look!
For the other plate, I simply stamped with Brilliance Galaxy Gold ink. The effect is good, but again it comes off easily with handling, and as it is a pigment ink it may easily smudge.
So, now I will be on a mission to see if I still actually own the Glue Pad ink pad - otherwise I will simply use the Glue Pad ink on a finger dauber to ink the stamps rather than using Versamark.
I found the Glue Pad ink easily washed off from the stencils, and it will no doubt easily wash off stamps too.
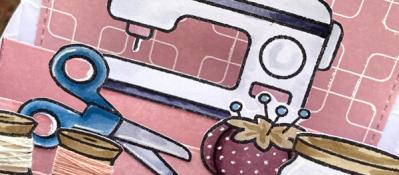
Once I finished up the three main elements for my card, I grabbed some coordinating papers, to create my card base.
To break up the patterns, I trimmed down the largest A2 Stitched Scallops die to create borders for the pink paper.
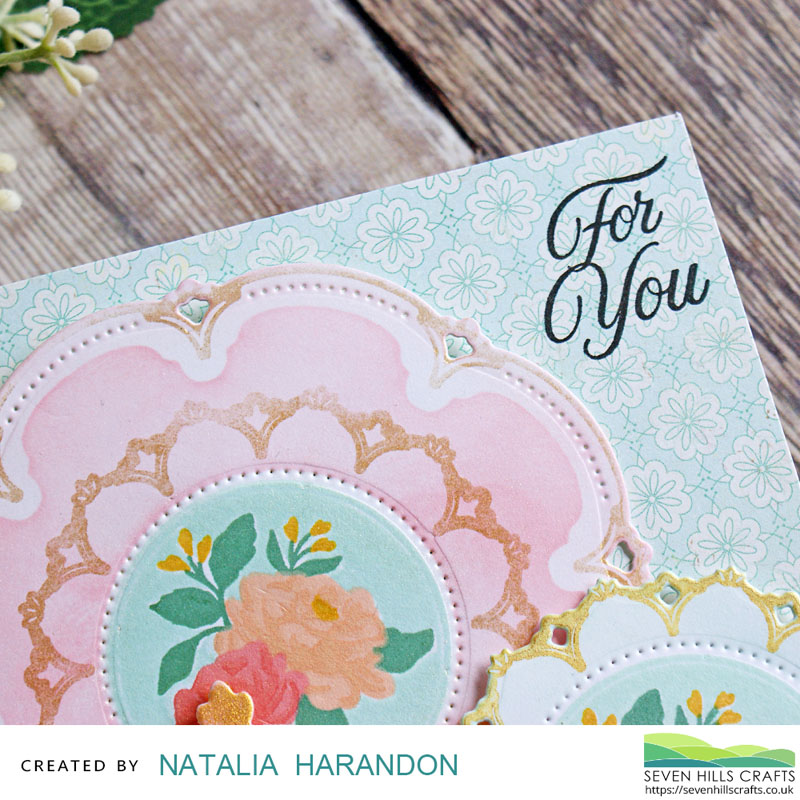
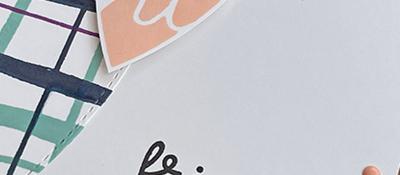
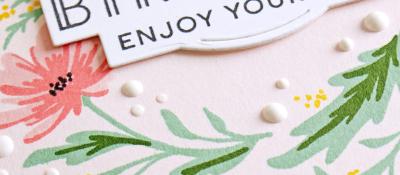
Before sticking anything else down, I stamped the For You sentiment from the Fine China set in the top right corner.
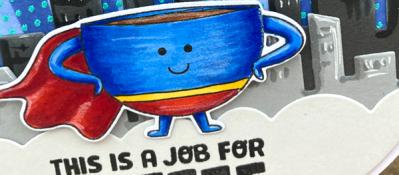
There was a little something missing from this card, so I took the teabag label and string from the Sips Tea die and stamp combo to add the Tea Time label coming out of the teapot.
And there we have it, card done!
I'm now looking forward to using the other die-cuts I cut and coloured on future projects.
Until next time, happy crafting!
Related Posts
The blog is back!
16/02/2020| Posted in Colouring Stamped Images, Copic Colouring, Pencil Colouring, Die Cutting| 6| 1122
Pottery Crazy
17/02/2020| Posted in Die Cutting, Stencilling, Stencilling with embossing paste, Special Effects| 1| 1258

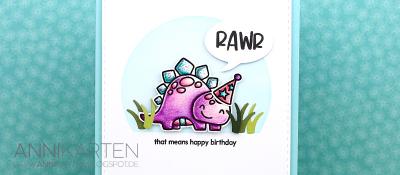
It's a RAWR-y Dino-mite Birthday!
06/03/2020| Posted in Copic Colouring, Ink Blending| 480

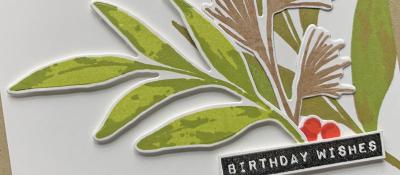
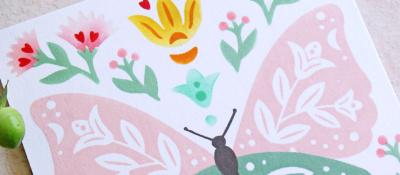
Butterfly Wreath
25/02/2020| Posted in Water Colouring, Card Making| 1| 459

Spice Pot Birthday Wishes
03/03/2020| Posted in Water Colouring, Stencilling| 1| 296
Birthday Baking
04/03/2020| Posted in Pencil Colouring, Die Cutting| 2| 257

Party Animals
07/03/2020| Posted in Colouring Stamped Images, Pencil Colouring| 439
Handcrafted Happiness
10/03/2020| Posted in Card Making| 2| 318
Flower Truck
09/03/2020| Posted in Pencil Colouring, Stamped Background| 373
A touch of pattern
13/03/2020| Posted in Die Cutting| 1| 286
Crafty Friends
18/03/2020| Posted in Copic Colouring, Die Cutting, Special Effects, Stamped Background, Interactive Cards| 340

Rainbow Birthday
14/03/2020| Posted in Copic Colouring, Die Cutting| 1| 446
Big Happy Birthday
21/03/2020| Posted in Colouring Stamped Images, Copic Colouring| 1| 261
Plant Kindness
22/03/2020| Posted in Copic Colouring| 341

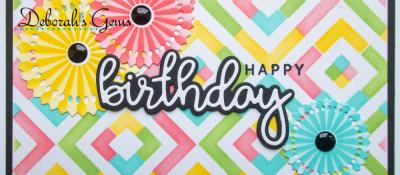
Cool Geometrics
26/03/2020| Posted in Card Making| 2| 231
Cute cactus birthday card
31/03/2020| Posted in Colouring Stamped Images, Die Cutting, Ink Blending, Stamping Techniques| 1| 716
Sending Rainbows
03/04/2020| Posted in Card Making| 409
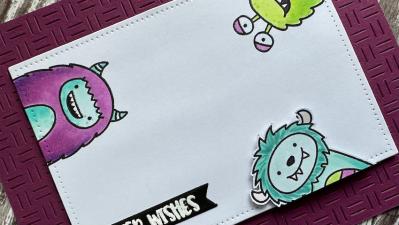
Monster Wishes
04/04/2020| Posted in Colouring Stamped Images, Copic Colouring| 441
Penguin Party
06/04/2020| Posted in Card Making, Shaped Cards| 363
Mistletoe.. but not as you know it!
13/04/2020| Posted in Die Cutting, Card Making| 1| 547
You Are Beautiful
16/04/2020| Posted in Ink Blending, Fussy Cutting| 458
Happy Bee-Day
17/04/2020| Posted in Die Cutting, Card Making| 616
Bring on the Cake
20/04/2020| Posted in Card Making, Interactive Cards| 479
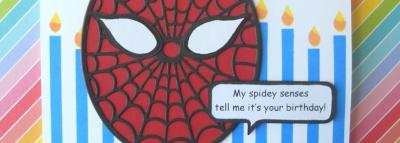
Spiderman
24/04/2020| Posted in Die Cutting, Stamping Techniques| 1| 601


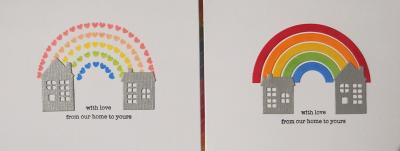
love from our home to yours
26/04/2020| Posted in Die Cutting, Stamping Techniques| 3| 595
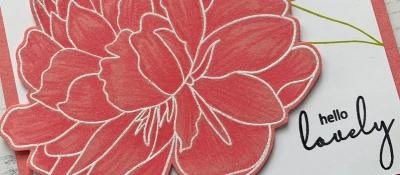
Hello Lovely
30/04/2020| Posted in Pencil Colouring, Card Making| 1| 368

Every Hour is Happy Hour in Lockdown!
03/05/2020| Posted in Die Cutting, Stamping Techniques| 1| 685
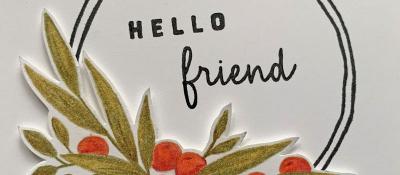
Hello Friend
07/05/2020| Posted in Card Making, Fussy Cutting| 256
Quick and Easy Male Gift card
12/05/2020| Posted in Ink Blending, Card Making| 1| 268
Birthday Blooms
14/05/2020| Posted in Card Making, Stamped Background| 2| 260
2020 Spring/Summer Coffee Lovers Blog Hop
22/05/2020| Posted in Paper Piecing, Card Making| 40| 867

Tropical Birthday
27/05/2020| Posted in Copic Colouring, Die Cutting, Card Making, Stamp Layering, Heat Embossing| 306
Colourful Beetles
25/05/2020| Posted in Die Cutting, Card Making| 668
Sending Warm Hugs
30/05/2020| Posted in Colouring Stamped Images, Pencil Colouring, Water Colouring, Ink Blending| 552

Spotlight Sentiments
31/05/2020| Posted in Stamping Techniques, Stamped Background| 467
Masculine Playful Patterns
04/06/2020| Posted in Die Cutting, Card Making| 379
Hello Friend
06/06/2020| Posted in Colouring Stamped Images, Die Cutting| 1| 396

Trigonometry Birthday
10/06/2020| Posted in Stamping Techniques, Card Making| 327
Fluttering By
11/06/2020| Posted in Card Making, Stencilling| 275

Shine Like a Diamond
17/06/2020| Posted in Copic Colouring, Die Cutting, Card Making, Stamp Layering, Stamped Background, Heat Embossing| 346
Bowl of Blooms
18/06/2020| Posted in Colouring Stamped Images, Card Making| 357
Distress Speckled Egg and Repeating Pattern Stamping
21/06/2020| Posted in Stamping Techniques, Repeat Pattern Building| 556
Bumping by to say..
22/06/2020| Posted in Colouring Stamped Images, Card Making| 693
Fox in a Forest
27/06/2020| Posted in Colouring Stamped Images, Water Colouring, Die Cutting, No Line Colouring| 383
It's a Pinata Party!
24/06/2020| Posted in Copic Colouring, Card Making| 739
Wish Big!
26/06/2020| Posted in Die Cutting| 268
Berry Sweet
29/06/2020| Posted in Water Colouring, Stencilling| 420
Rainbows & Party Animals
02/07/2020| Posted in Card Making, Stamped Background| 252
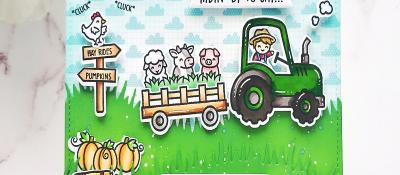
Farming Fun
10/07/2020| Posted in Colouring Stamped Images, Copic Colouring, Pencil Colouring, Fussy Cutting| 284
Slim is In!
19/07/2020| Posted in Die Cutting| 577
Birthday Balloons
29/07/2020| Posted in Colouring Stamped Images, Copic Colouring, Die Cutting, Card Making, Heat Embossing| 413
Peekaboo birthday
28/07/2020| Posted in Colouring Stamped Images, Die Cutting| 400
Paper Hugs
05/08/2020| Posted in Copic Colouring, Die Cutting, Ink Blending, Card Making, Stamped Background, Interactive Cards, Heat Embossing| 433
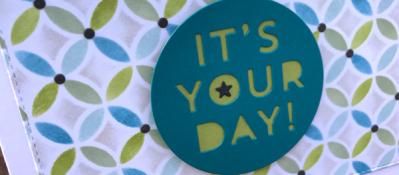
It's Your Day!
03/08/2020| Posted in Die Cutting, Stencilling| 285
Monkey Sea Monkey Do!
07/08/2020| Posted in Copic Colouring, Card Making| 288
The Cow Jumps over the moon
04/08/2020| Posted in Colouring Stamped Images, Die Cutting, Ink Blending, Card Making, Interactive Cards, Heat Embossing| 396


An Alternative Gift Bag
24/08/2020| Posted in Die Cutting, Card Making, Stamped Background, Interactive Cards, Heat Embossing, Repeat Pattern Building, Gift Making| 624
Slimline Florals
18/08/2020| Posted in Ink Blending, Stencilling| 254
Camping Critters
21/08/2020| Posted in Copic Colouring| 369
Hippo Pool Party
22/08/2020| Posted in Colouring Stamped Images, Pencil Colouring| 358
No Stitch Stitching Dies
23/08/2020| Posted in Stitching/Embroidery| 1| 598
Birthday Shakers
26/08/2020| Posted in Die Cutting, Stamping Techniques, Card Making, Stamped Background, Fussy Cutting, Heat Embossing, turnabouts, Repeat Pattern Building, Stamping on non paper surfaces| 434
Hey Friend!
27/08/2020| Posted in Die Cutting, Card Making| 322

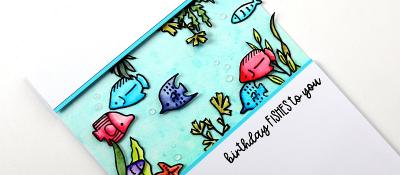
Birthday Fishes To You
29/08/2020| Posted in Colouring Stamped Images, Copic Colouring| 334
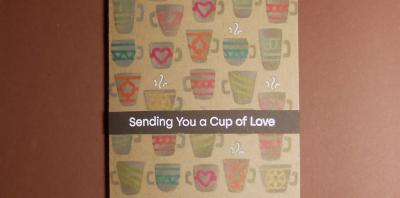
A Cup Of Love
28/08/2020| Posted in Stencilling| 270
Peek-a-Boo Jungle
04/09/2020| Posted in Copic Colouring, Card Making| 396
Have a thrilling birthday
08/09/2020| Posted in Colouring Stamped Images, Die Cutting, Card Making, Stencilling, Interactive Cards| 322

Gnome Girl on the Blog
12/09/2020| Posted in Colouring Stamped Images, Pencil Colouring| 417

Merry Drink To Forgetmas
13/09/2020| Posted in Die Cutting| 2| 1472
Birthday Queen
23/09/2020| Posted in Card Making, Stamped Background| 395
Selfie Party Pics
18/09/2020| Posted in Copic Colouring, Card Making| 1106
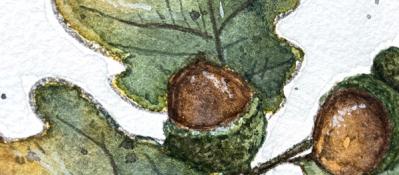
Autumn Acorns
28/09/2020| Posted in Water Colouring, Card Making| 307
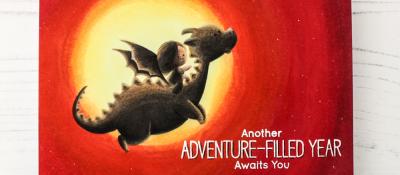
Sunset Dragon Scene Card
02/10/2020| Posted in Copic Colouring| 1| 388
Yeti or Not: Happy Birthday
03/10/2020| Posted in Copic Colouring, Ink Blending| 1| 305
One Stencil, Three Cards!
08/10/2020| Posted in Stencilling| 241
Autumn Nuts
18/10/2020| Posted in Ink Blending, Inktense Pencils| 451
Cozy Friends
19/10/2020| Posted in Die Cutting, Card Making| 495
Colorado Craft Company Week!
25/10/2020| Posted in Water Colouring| 2| 494
Aloha, 3 ways to colour your stamps.
27/10/2020| Posted in Colouring Stamped Images, Copic Colouring, Pencil Colouring, Water Colouring, Card Making| 3| 424
Delight in the Little Things
29/10/2020| Posted in Ink Blending, Card Making| 2| 284
Big and Bold Peacocks
30/10/2020| Posted in Copic Colouring, Card Making| 2| 442
Blossoms and Berries
02/11/2020| Posted in Stamping Techniques, Card Making| 2| 562
Lets Party!
03/11/2020| Posted in Die Cutting| 1| 260
Birthday Fishes
07/11/2020| Posted in Colouring Stamped Images, Water Colouring| 1| 195
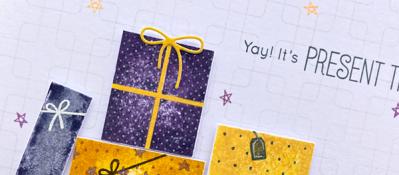
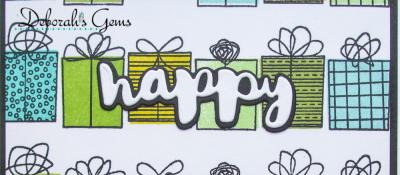
Present Time!
09/11/2020| Posted in Stamping Techniques, Card Making, Fussy Cutting, Repeat Pattern Building, Masking| 321

Friends and Christmas
18/11/2020| Posted in Stamping Techniques, Card Making, Stamp Layering, Stamped Background, Masking| 1| 391
A Winter Scene
23/11/2020| Posted in Colouring Stamped Images, Copic Colouring, Card Making, Interactive Cards, Shaped Cards| 2| 392
Hello on this Rainy day
24/11/2020| Posted in Copic Colouring, Die Cutting| 2| 303
Snowball Fun
30/11/2020| Posted in Colouring Stamped Images, Card Making| 2| 349
Floral Birthdays
09/12/2020| Posted in Colouring Stamped Images, Die Cutting, Stamping Techniques, Card Making, Stamped Background, Heat Embossing| 1| 250

All the THANKS
10/12/2020| Posted in Die Cutting, Card Making| 2| 443

Happy New Year!
03/01/2021| Posted in Pencil Colouring, Water Colouring| 2| 668
Birthday Roses
07/01/2021| Posted in Colouring Stamped Images, Copic Colouring, Card Making, Stencilling, Stamped Background| 1| 279

Birthday Burst!
11/01/2021| Posted in Die Cutting, Card Making| 1| 302
Going Dotty!
20/01/2021| Posted in Copic Colouring, Die Cutting, Stamping Techniques, Card Making, Stamped Background| 1| 242
Birthday Cupcake
15/01/2021| Posted in Copic Colouring, Card Making| 1| 561
A Tale of Two Hearts
17/01/2021| Posted in Die Cutting| 1| 499
HAPPY HAPPY Birthday!
21/01/2021| Posted in Colouring Stamped Images, Copic Colouring, Stamping Techniques, Card Making, Fussy Cutting, Repeat Pattern Building| 1| 262
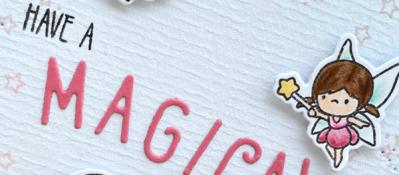
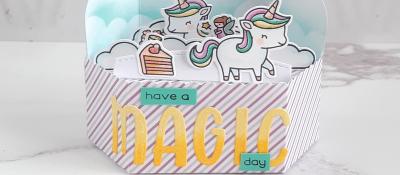
Magical Day
27/01/2021| Posted in Copic Colouring, Die Cutting, Card Making, Fussy Cutting, Heat Embossing| 1| 235


Slimline Birthday Card
30/01/2021| Posted in Colouring Stamped Images, Pencil Colouring, Water Colouring, Die Cutting| 1| 541
Let the Good Times Roll!
29/01/2021| Posted in Copic Colouring, Card Making| 1| 352

Thank you Mr Postman!
03/02/2021| Posted in Die Cutting, Stamping Techniques, Card Making, Stamp Layering, Stamped Background, turnabouts| 1| 420

Poppin' Popcorn
01/02/2021| Posted in Off The Page Projects, Stencilling with embossing paste, Heat Embossing| 1| 343
More Hearts!
10/02/2021| Posted in Die Cutting, Stamping Techniques, Card Making, Stamped Background, Heat Embossing, turnabouts| 1| 226

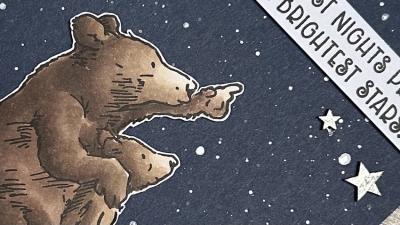
Bears on Adventure
13/02/2021| Posted in Colouring Stamped Images, Pencil Colouring, Water Colouring, Die Cutting, Ink Blending, Stencilling| 1| 501

A Little Something...
18/02/2021| Posted in Colouring Stamped Images, Copic Colouring, Stamping Techniques, Card Making, Stencilling, Masking| 1| 273
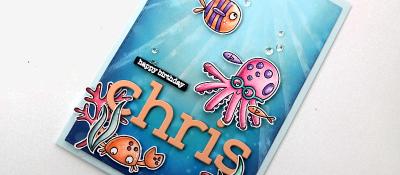
Underwater Birthday Wishes
19/02/2021| Posted in Copic Colouring, Card Making| 1| 629

Trig 102
24/02/2021| Posted in Copic Colouring, Die Cutting, Card Making, Fussy Cutting, Heat Embossing, Repeat Pattern Building| 1| 601
Birthday Blooms
04/03/2021| Posted in Die Cutting, Card Making| 1| 286
Birthday Buds
06/03/2021| Posted in Colouring Stamped Images, Pencil Colouring| 1| 407

Elephantastic
25/03/2021| Posted in Colouring Stamped Images, Pencil Colouring, Card Making, Stamped Background, Masking| 2| 355
Every Friendship has a story
06/04/2021| Posted in Die Cutting, Ink Blending, Stamping Techniques, Card Making, Heat Embossing| 1| 275
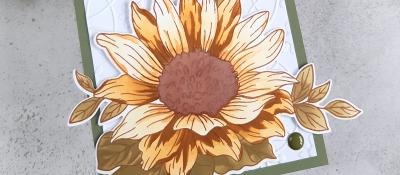
Hello Sunflowers
08/04/2021| Posted in Colouring Stamped Images, Pencil Colouring, Card Making, Fussy Cutting| 1| 340
Happy Birthdays
14/04/2021| Posted in Copic Colouring, Die Cutting, Card Making, Stamped Background, Shaped Cards| 1| 397
Dandy Lion
11/04/2021| Posted in Pencil Colouring, Water Colouring, Interactive Cards, Fussy Cutting, Embossing Folders| 2| 432
Hex Layers
15/04/2021| Posted in Ink Blending, Card Making, Stencilling, Stencilling with embossing paste| 1| 272

Floral Fancies
25/04/2021| Posted in Off The Page Projects, Stamp Layering, Partial Die Cutting, Gift Making, Stamping on non paper surfaces| 2| 414
Let's Party Birthday Cards
28/04/2021| Posted in Copic Colouring, Die Cutting, Stamping Techniques, Card Making, Stamped Background, Interactive Cards, Heat Embossing, turnabouts, Masking, Stamping| 1| 349
Hi-Ya!!
26/04/2021| Posted in Colouring Stamped Images, Die Cutting, Ink Blending, sentiment Focal Points| 4| 733
Eclectic Florals
29/04/2021| Posted in Colouring Stamped Images, Pencil Colouring, Die Cutting, Card Making, No Line Colouring, Fussy Cutting| 1| 378
Introducing Elliot & Marcel
02/05/2021| Posted in Pencil Colouring, Stamping| 388

Aloha
06/05/2021| Posted in Colouring Stamped Images, Copic Colouring, Card Making, Fussy Cutting, Stamping| 1| 289
We Herd It's Your Birthday!
07/05/2021| Posted in Copic Colouring| 1| 397
More Brilliant Butterflies
12/05/2021| Posted in Die Cutting, Stamping Techniques, Card Making, Stamp Layering, Heat Embossing, Stamping| 1| 319
Floral Birthdays
19/05/2021| Posted in Die Cutting, Stamping Techniques, Card Making, Stamp Layering, turnabouts, Stamping| 1| 524
Going Dotty!
20/05/2021| Posted in Colouring Stamped Images, Copic Colouring, Stamping Techniques, Card Making, Stamp Layering, Stamping, sentiment Focal Points| 2| 336
Starry Birthday
26/05/2021| Posted in Copic Colouring, Ink Blending, Card Making, Fussy Cutting, Heat Embossing, turnabouts, Stamping| 1| 252
“The rules are… there ain’t no rules!”
02/06/2021| Posted in Colouring Stamped Images, Copic Colouring, Stamping Techniques, Card Making, Fussy Cutting, Stamping| 328
Kick Back and Chill
07/06/2021| Posted in Water Colouring, Card Making| 579
Cup of Friendship
10/06/2021| Posted in Colouring Stamped Images, Pencil Colouring, Stamping Techniques, Card Making, Heat Embossing, Stamping| 314
Time to Paw-ty!!!
12/06/2021| Posted in Sketches| 250

Rainbow Birthday
16/06/2021| Posted in Copic Colouring, Die Cutting, Ink Blending, Card Making, Stamped Background, Interactive Cards, Fussy Cutting, Heat Embossing| 514
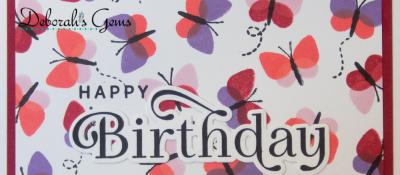
Amazing Butterflies
17/06/2021| Posted in Colouring Stamped Images, Copic Colouring, Die Cutting, Stamping Techniques, Card Making, Stencilling, Heat Embossing, Stamping| 318
Hay There Birthday
02/07/2021| Posted in Copic Colouring, No Line Colouring| 330

Sending Rainbows in the Rain
18/06/2021| Posted in Copic Colouring, No Line Colouring| 562
Birthday Gifts
16/07/2021| Posted in Pencil Colouring, No Line Colouring| 1| 337
Birthday 3D Floral
19/06/2021| Posted in Copic Colouring, Embossing Folders| 257

Coaster Fun
21/06/2021| Posted in Colouring Stamped Images, Ink Blending, Card Making, Fussy Cutting, Shaped Cards| 260
Wild Paradise
25/06/2021| Posted in Ink Blending, Stamping Techniques, Card Making, Stencilling, Stamped Background, Fussy Cutting, Heat Embossing, Masking| 281
Leaves or Feathers?
24/06/2021| Posted in Die Cutting| 1| 321
Don't be afraid of colour!
29/06/2021| Posted in Die Cutting, Card Making| 238
Hey Friend!
01/07/2021| Posted in Die Cutting, Stamping Techniques, Card Making, Stamped Background, turnabouts, Stamping| 270
Recharge with Watercolour
03/07/2021| Posted in Water Colouring, Card Making| 380
Flock of Seagulls
05/07/2021| Posted in Colouring Stamped Images, Copic Colouring, Ink Blending, Card Making, Stamped Background| 389
Quick Masculine Makes
04/07/2021| Posted in Stamping Techniques| 283
Birthday fun
06/07/2021| Posted in Colouring Stamped Images| 338
Shaking Up The World
10/07/2021| Posted in Shaker Cards| 276

Birthday Sprinkles
19/07/2021| Posted in Die Cutting, Stamping| 232
All dies, No Stamps
20/07/2021| Posted in Die Cutting| 434
Floating On By
26/07/2021| Posted in Copic Colouring, Die Cutting, Ink Blending, Stencilling, sentiment Focal Points| 268
First Birthday Animals
02/08/2021| Posted in Colouring Stamped Images, Pencil Colouring, Stamped Background, Fussy Cutting| 446
A Cat Isn't Just for Christmas
30/07/2021| Posted in Pencil Colouring, Die Cutting| 267
Whale of a birthday
01/08/2021| Posted in Ink Blending, Stamp Layering| 234

Bright Birthday Geometrics
05/08/2021| Posted in Die Cutting, Card Making| 436

Playful Patterns
10/08/2021| Posted in Die Cutting, Ink Blending| 246
Friend Like You
12/08/2021| Posted in Stamping Techniques, Card Making, Stamped Background, turnabouts, Stamping| 203
Succulent Bouquet Four Ways
18/08/2021| Posted in Copic Colouring, Water Colouring, Die Cutting, Card Making, Off The Page Projects, Heat Embossing, Patterned Papers, Stamping| 369
S'more fun with you
17/08/2021| Posted in Copic Colouring, Die Cutting| 197

Oh Happy Day!
20/08/2021| Posted in Copic Colouring| 320
Sweater Weather!!
25/08/2021| Posted in Copic Colouring, Die Cutting, Stamping Techniques, Card Making, Stamped Background, Stamping, Embossing Folders| 427

Patterned Paper Play
27/08/2021| Posted in Die Cutting, Patterned Papers| 1| 365
A Wreath for All Seasons
01/09/2021| Posted in Copic Colouring, Die Cutting, Card Making, Stamped Background, Fussy Cutting, Heat Embossing, turnabouts, Stamping| 477
The Season In-Between!
02/09/2021| Posted in Ink Blending, Card Making| 259

The Little Things
03/09/2021| Posted in Pencil Colouring, No Line Colouring| 1| 253
Gone But Not Forgotten
08/09/2021| Posted in Copic Colouring, Die Cutting, Card Making, Stamped Background, Repeat Pattern Building, Stamping| 520
Creating with restrictions
07/09/2021| Posted in Die Cutting, Card Making| 250

All The Three's
11/09/2021| Posted in Copic Colouring, Card Making, Stencilling with embossing paste, Fussy Cutting, Stamping, stamp surgery| 304
Snow Buddies
13/09/2021| Posted in Colouring Stamped Images, Stencilling| 256
Picture Perfect!
17/09/2021| Posted in Copic Colouring| 318
Autumn Leaves
21/09/2021| Posted in Die Cutting, Card Making| 1| 342
Heroes On The Inside
02/10/2021| Posted in Ink Blending, Interactive Cards| 253
Sweet Gingko
05/10/2021| Posted in Die Cutting, Ink Blending, Card Making, Stamp Layering, Stamped Background, Stamping, Layering Stencils| 429
Butterfly Dies
14/10/2021| Posted in Die Cutting, Card Making, Special Effects, Fancy Folds, Stamping, Clean & Simple| 1| 254
Happy as a Seagull with a Chip
15/10/2021| Posted in Copic Colouring, No Line Colouring| 307

Alcohol Markers on Embossed metal
26/10/2021| Posted in Card Making, Embossing Folders| 319
Masculine Birthday Card
03/11/2021| Posted in Copic Colouring, Die Cutting, Card Making, Stamping, sentiment Focal Points| 321
The Big 5-0
05/11/2021| Posted in Die Cutting, Heat Embossing| 419

Caffeine Inspiration
17/11/2021| Posted in Copic Colouring, Die Cutting, Stamped Background, turnabouts, Stamping, Mini Slimline Card, Clean & Simple| 352
All Stacked Up
27/11/2021| Posted in Copic Colouring, Card Making, Interactive Cards, Fussy Cutting, Patterned Papers, Stamping, Clean & Simple| 348
Mini Superhero
04/12/2021| Posted in Copic Colouring, Fussy Cutting| 377
Winter Wreath
13/12/2021| Posted in Pencil Colouring, Card Making| 380
Twinkle Twinkle
18/12/2021| Posted in Copic Colouring, Off The Page Projects| 1| 958
Happy Birthday
22/12/2021| Posted in Die Cutting, Stamping Techniques, Card Making, Stamped Background, Layering Stencils| 372

Every Day Labels His and Hers
09/01/2022| Posted in Die Cutting, Stamping Techniques| 324

Masculine Birthday Cards
26/01/2022| Posted in Die Cutting, Stamping Techniques, Card Making, Stamped Background, Embossing Folders, Layering Stencils| 496
Lets Conga
15/01/2022| Posted in Copic Colouring, Card Making, Off The Page Projects, Stamping, Clean & Simple| 1| 1241

I Smell A Birthday
29/01/2022| Posted in Copic Colouring, Card Making, Fussy Cutting, Patterned Papers, Stamping, Sketches, Clean & Simple| 305

Big Birthday Balloons
04/02/2022| Posted in Die Cutting| 240

Flowers For Your Birthday
11/02/2022| Posted in Die Cutting| 360
Life
12/02/2022| Posted in Copic Colouring, Sketches| 319

One Layer Wonders!
17/02/2022| Posted in Ink Blending, Card Making, Stencilling, Stamping, Clean & Simple, Stencilled backgrounds| 340

Friends Fur-ever
25/02/2022| Posted in Copic Colouring, Card Making, Partial Die Cutting, Fussy Cutting, Stamping, Clean & Simple| 1| 314
3 ways with CCC Teacups and Mice
01/03/2022| Posted in Colouring Stamped Images| 494

Hello Dear Friend
10/03/2022| Posted in Stamping Techniques, Card Making, Stamped Background, Fussy Cutting, Stamping, Clean & Simple| 244
Smooshed Blooms
17/03/2022| Posted in Colouring Stamped Images, Water Colouring, Die Cutting, Stamping Techniques, Card Making, Special Effects, Stamping, Clean & Simple| 304
Tiny Flowers
18/03/2022| Posted in Die Cutting| 371
You Raise Me Up
19/03/2022| Posted in Water Colouring| 264
Fairy Magic
28/03/2022| Posted in Colouring Stamped Images, sentiment Focal Points| 229
Birthdays
06/04/2022| Posted in Copic Colouring, Die Cutting, Card Making, Stamped Background, Heat Embossing| 2| 387
Friendship & Smiles
07/04/2022| Posted in Card Making, Stamped Background, Stamping, sentiment Focal Points, Clean & Simple| 313
3 ways to Purrfection
09/04/2022| Posted in Stamped Background, Sketches| 294
Wanna Hang Out
16/04/2022| Posted in Copic Colouring, Clean & Simple| 315
Birthday Bar
17/04/2022| Posted in Copic Colouring, Die Cutting| 314
Sending Birthday Flowers
18/04/2022| Posted in Card Making, Stamping| 226
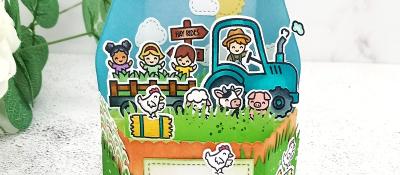
Down On The Farm
19/04/2022| Posted in Copic Colouring, Die Cutting, Ink Blending, Card Making, Stencilling, Interactive Cards| 157
One Layer Cards
20/04/2022| Posted in Card Making, Stamped Background| 336
Hey There Beautiful Friend
21/04/2022| Posted in Ink Blending, Card Making, Stencilling, Layering Stencils, Stencilled backgrounds| 242
Fake Cake
22/04/2022| Posted in Die Cutting| 393
Chevron Pattern Play
23/04/2022| Posted in Paper Piecing, Card Making, Patterned Papers, Stitching/Embroidery, Clean & Simple| 393

Geometric Quilt
27/04/2022| Posted in Die Cutting, Card Making| 328
Happy Birthday
04/05/2022| Posted in Copic Colouring, Ink Blending, Card Making, Stencilling, Stencilled backgrounds| 332
Pussy Willow
29/04/2022| Posted in Die Cutting, Die Cut Felt and Fabric| 417
Birthday Magic
02/05/2022| Posted in Colouring Stamped Images, Copic Colouring, Card Making, sentiment Focal Points, Clean & Simple| 262
Birthday Hugs and Kisses
08/05/2022| Posted in Die Cutting| 295
BBQ Time
09/05/2022| Posted in Die Cutting| 275

More Sunshine, Less Umbrella's - Please!
12/05/2022| Posted in Colouring Stamped Images, Copic Colouring, Stamping Techniques, Card Making, Stamped Background, Clean & Simple| 263
The Personal Touch
14/05/2022| Posted in Card Making, Partial Die Cutting| 314
Rainbow Spacers and a Busy Week in Store
15/05/2022| Posted in Die Cutting| 365

Just Saying Hello
26/05/2022| Posted in Die Cutting, Ink Blending, Stencilling, Layering Stencils, Stencilled backgrounds| 240
Monochrome Moustache
28/05/2022| Posted in Patterned Papers| 238
Super Duper
30/05/2022| Posted in Colouring Stamped Images, Copic Colouring, Die Cutting, Card Making, sentiment Focal Points| 265

Pool Party
09/06/2022| Posted in Colouring Stamped Images, Die Cutting| 235
Making the Most of Mini Stamps - Part Two
12/06/2022| Posted in Stamped Background| 280
Circle Quad
11/06/2022| Posted in Patterned Papers| 300
Having a Hoot of A Time
19/06/2022| Posted in Pencil Colouring, Die Cutting| 292
Fishing You A Happy Birthday
25/06/2022| Posted in Stamping, mixed media, Clean & Simple, Inky Backsides, Clean and Simple (CAS)| 231
Birthday Rose
01/07/2022| Posted in Card Making, Stamp Layering, Stamped Background, Masking, Stencilled backgrounds| 321

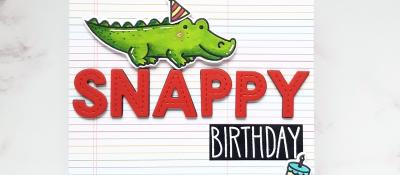
Snappy Birthday Wishes
02/07/2022| Posted in Copic Colouring, Ink Blending, Card Making, Fussy Cutting, Inky Backsides| 364
Greetings from the Couch
04/07/2022| Posted in Die Cutting, Shaped Cards| 310
Picnic In The Sky
12/07/2022| Posted in Colouring Stamped Images, Copic Colouring, Die Cutting, Ink Blending, Card Making, Stencilling| 252
Mini Gift Notes
17/07/2022| Posted in Die Cutting, Gift Making| 302
Stitched Florals
23/07/2022| Posted in Die Cutting, Card Making, Off The Page Projects, Stitching/Embroidery, Stamping, sentiment Focal Points, Clean & Simple| 468
Say it with Balloons
01/08/2022| Posted in Die Cutting, Stamping| 244
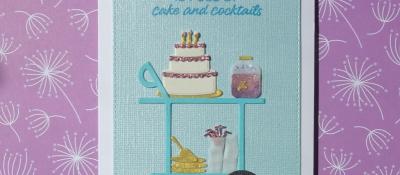
Cocktail Cheers
08/08/2022| Posted in Die Cutting, colouring die cuts| 416
Maybe it's Coffee
15/08/2022| Posted in Homeware/Decorations, colouring die cuts| 275

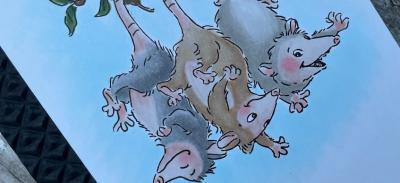
Hey Possum
20/08/2022| Posted in Copic Colouring, Embossing Folders| 1| 270
Is it on the trolley?
21/08/2022| Posted in Die Cutting| 357
Pick A Pattern
25/08/2022| Posted in Stamping Techniques, Card Making, Stamping, Clean & Simple, Clean and Simple (CAS)| 315
I'll Be There
29/08/2022| Posted in Die Cutting| 278
Grateful pumpkins
04/09/2022| Posted in Pencil Colouring| 255
To The Rescue
17/09/2022| Posted in Copic Colouring, Ink Blending, Stencilling with embossing paste, Fussy Cutting, Inky Backsides| 175


Birthday Tweet
17/10/2022| Posted in Colouring Stamped Images| 2| 274
Coffee Lovers Blog Hop Fall 22
11/11/2022| Posted in Stamp Layering| 19| 410
Autumnal Warm Wishes
10/11/2022| Posted in Stamping Techniques, Card Making, turnabouts, Clean & Simple, Clean and Simple (CAS)| 347

Rainbow Cheer
17/11/2022| Posted in Die Cutting, Stamping Techniques, Card Making, Stamped Background, Clean & Simple| 233
Polar Opposites
19/11/2022| Posted in Water Colouring, Card Making, Heat Embossing, Stamping, Clean & Simple, Clean and Simple (CAS)| 353

Cards for my Great Nephew
25/11/2022| Posted in Card Making, Stamped Background, turnabouts, Stamping, colouring die cuts| 259
Star Gazing
26/11/2022| Posted in Copic Colouring, Fussy Cutting| 308
Plant A Succulent - Hugs Card
29/11/2022| Posted in Die Cutting, Card Making| 209
Winter Pine
05/12/2022| Posted in Colouring Stamped Images, Stamping| 292
Autumn Sunflower
06/12/2022| Posted in Die Cutting, Ink Blending, Card Making, Heat Embossing, Layering Stencils| 198
Birthday Flowers
09/12/2022| Posted in Copic Colouring, Die Cutting, Card Making, Stamping, Stencilled backgrounds| 347

Christmas with Friends
10/12/2022| Posted in Copic Colouring, Die Cutting, Stamping Techniques, Partial Die Cutting, Fussy Cutting| 246
Fantasy Jungle
13/12/2022| Posted in Ink Blending, Card Making, Stencilling, Embossing Folders, Layering Stencils| 231
Stacks of Presents
07/01/2023| Posted in Copic Colouring, Patterned Papers| 165

Penguin Party
09/01/2023| Posted in Patterned Papers, Stamping| 159

One Background - Four Ways
20/01/2023| Posted in Copic Colouring, Die Cutting, Card Making, Stamped Background, Heat Embossing, Stamping| 262
White Diecutting and Yummy Cakes
18/01/2023| Posted in Die Cutting, water colour pencils| 324
Graphic Weaving
25/01/2023| Posted in Die Cutting, paper weaving| 205
Encouraging Notecards
06/02/2023| Posted in Die Cutting, Card Making| 1| 239
Abstract Gouache Greeting Card
07/02/2023| Posted in Card Making, gouache painting| 211
Organic Cherry Blossom
08/02/2023| Posted in Die Cutting, Ink Blending| 274
A Trio of Cards
24/02/2023| Posted in Copic Colouring, Card Making, Stencilling, Fussy Cutting, Stamping, Stencilled backgrounds| 350
Ghost Bricks
22/02/2023| Posted in Ink Blending, Card Making, Stencilling, Layering Stencils, Clean & Simple| 311
Tiny Giant Birthday
05/03/2023| Posted in Die Cutting| 225
Soak & Relax
06/03/2023| Posted in Die Cutting, Homeware/Decorations| 295
Sunshine and Hugs
07/03/2023| Posted in Die Cutting, Card Making| 307
it's Your Day
22/03/2023| Posted in Die Cutting| 272
Hot Dog!
25/03/2023| Posted in Copic Colouring, Off The Page Projects| 301
Garden Goodness Birthday Blooms
12/04/2023| Posted in Die Cutting, Card Making, Stamp Layering, Stencilling, Layering Stencils, Stencilled backgrounds| 360
Boho Butterflies
30/03/2023| Posted in Die Cutting, Ink Blending, Card Making, Stencilling, Layering Stencils, Clean & Simple| 1| 281
Howdy Raccoon
15/04/2023| Posted in Colouring Stamped Images, Copic Colouring, Stamping Techniques, Stamped Background, Fussy Cutting, Stamping| 327

Llamas do Yoga
13/05/2023| Posted in Copic Colouring| 211
Hold on Tight
27/05/2023| Posted in Copic Colouring, Die Cutting| 242
Classy in Pink
21/04/2023| Posted in Die Cutting| 200

Rain or Shine - I'll Be There For You
25/04/2023| Posted in Die Cutting, Card Making| 168

Iced Mini Cake
07/05/2023| Posted in Die Cutting, Stencilling with embossing paste| 314

Simply Make a Wish
12/05/2023| Posted in Stamping Techniques| 228

Mod Turnabout
14/05/2023| Posted in Stamping Techniques, turnabouts| 358
Just for you on your birthday
17/05/2023| Posted in Die Cutting, Stamping Techniques, Card Making, Stamped Background, turnabouts, Stamping| 223
Sewn with love
23/05/2023| Posted in Copic Colouring, Card Making| 249
Ornate Florals
02/06/2023| Posted in Die Cutting, Faux Embossing| 197
First Steps in the Urban Jungle
09/06/2023| Posted in Die Cutting, Ink Blending| 240
Takes the Cake!
12/06/2023| Posted in Die Cutting, Card Making, Stamped Background, Stamping, Layering Stencils| 267
Partners In Adventure
17/06/2023| Posted in Copic Colouring, Die Cutting, Paper Piecing, Card Making, Fussy Cutting, Patterned Papers, Stamping, Clean & Simple, Clean and Simple (CAS)| 247

Pawsome Party In the Park
22/06/2023| Posted in Pencil Colouring, Die Cutting| 181
All Aglow
28/06/2023| Posted in Card Making, Stencilling, Stamped Background, Stamping, Layering Stencils| 259
Circular Sentiment Stamping with a Stamp Wheel Tool
25/06/2023| Posted in Stamping, Stamp Wheel| 190

Hey Beautiful
29/06/2023| Posted in Colouring Stamped Images, Copic Colouring, Stamping Techniques, Card Making, Heat Embossing, Clean & Simple| 190
Tips and Tricks for Easy Paper Piecing with Large Dies
09/07/2023| Posted in Die Cutting, Paper Piecing| 273
A Chilled Day
10/07/2023| Posted in Colouring Stamped Images, Ink Blending, Card Making, sentiment Focal Points, colouring die cuts| 254
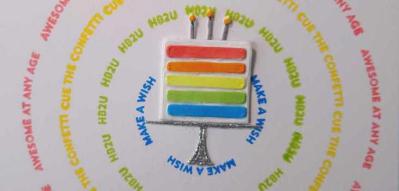
Make a Wish...
12/07/2023| Posted in Die Cutting, Card Making, Stamp Layering, Stamping, Clean & Simple, Clean and Simple (CAS)| 295


Donuts and Sprinkles
14/07/2023| Posted in Copic Colouring, Die Cutting| 215

Garden Goodness Birthday Wishes
19/07/2023| Posted in Die Cutting, Card Making, Stamping, sentiment Focal Points, Layering Stencils, Stencilled backgrounds| 296
Floral Frame
26/07/2023| Posted in Card Making, Stamp Layering, Stamping, sentiment Focal Points, Stencilled backgrounds| 320

Ice Cream Helps
31/07/2023| Posted in Colouring Stamped Images, Copic Colouring, Pencil Colouring, Card Making, Heat Embossing, Clean & Simple| 261
Cross the Ocean
29/07/2023| Posted in Copic Colouring| 158
Bloomin' Wonderful!
03/08/2023| Posted in Die Cutting, Stamping Techniques, Card Making, Stamped Background, Clean & Simple| 199
Just for You
16/08/2023| Posted in Die Cutting, Card Making, Stamp Layering, Stamped Background, Stamping, sentiment Focal Points| 228

Happy Bee-Day
15/08/2023| Posted in Copic Colouring, Die Cutting, Ink Blending, Card Making, Stamping, Stencilled backgrounds| 189
Picked Posies - Just for You
23/08/2023| Posted in Die Cutting, Card Making| 235
Embossing Magic... 2 ways!
22/08/2023| Posted in Die Cutting, Ink Blending, Card Making, Heat Embossing, Embossing Folders| 203
Hay Ride Drive By
24/08/2023| Posted in Pencil Colouring, Masking| 184
Friday Feel Good Floral
25/08/2023| Posted in Ink Blending, Stencilling, Clean & Simple, Stencilled backgrounds, Stamp Wheel| 236

Flying By...
03/09/2023| Posted in Stencilling, Layering Stencils| 250
Home Grown Notecard
04/09/2023| Posted in Clean & Simple, colouring die cuts| 208
Fall Foliage
13/09/2023| Posted in Die Cutting, Ink Blending, Card Making, colouring die cuts, water colour pencils| 242
Hope Your Day Is Filled With Fun
12/09/2023| Posted in Colouring Stamped Images, Die Cutting, Ink Blending, Card Making, Interactive Cards| 161

Autumn Vibes
25/09/2023| Posted in Die Cutting, Card Making| 272
Gnomes in the sunflower patch
29/09/2023| Posted in Pencil Colouring| 233
Pumpkin Treat Boxes
13/10/2023| Posted in Die Cutting, Gift Making| 219
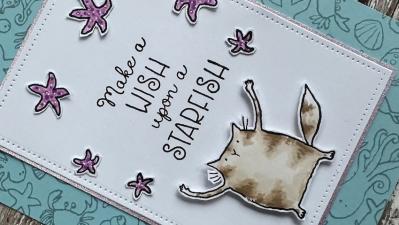
Wish Upon a Star Fish
04/11/2023| Posted in Copic Colouring, Card Making, Stamped Background, Fussy Cutting, Stamping, Sketches, Clean & Simple, Clean and Simple (CAS)| 255

Introducing Flashback Friday Bargains
20/10/2023| Posted in Copic Colouring| 1| 1115

Out with the old, in with the new!
03/01/2024| Posted in Card Making, sentiment Focal Points| 192
Hello 2024
04/01/2024| Posted in Card Making, Stencilling, Layering Stencils, Clean & Simple, Clean and Simple (CAS)| 174
More than Merry Sprigs
10/01/2024| Posted in Stamping Techniques, Card Making, Stamp Layering, Stamped Background, Stamping| 187
Infinity Birthday Card
08/01/2024| Posted in Die Cutting, Interactive Cards| 228

Ski Season
19/01/2024| Posted in Die Cutting| 152
Layered Embossing Technique
21/01/2024| Posted in Embossing Folders| 209
It's a Tweet Life
20/01/2024| Posted in Stencilling| 239
Metallic Magic: Crafting a Dramatic Black Floral Card
29/01/2024| Posted in Water Colouring, Die Cutting, Stamping Techniques, Card Making, Flashback Friday Bargains| 216

Let's Party!
01/02/2024| Posted in Die Cutting, Ink Blending, Card Making, Stencilling, Clean & Simple, Stencilled backgrounds| 189

Legend-diary Birthday
04/02/2024| Posted in Copic Colouring, Die Cutting| 205
Garden Goodness
07/02/2024| Posted in Card Making, Stamp Layering, Stencilling, Layering Stencils, Clean & Simple, Stencilled backgrounds, Clean and Simple (CAS)| 210

Pop Heart Hugs
08/02/2024| Posted in Die Cutting, Stamping Techniques, Card Making, Stamped Background, turnabouts, Stamp Wheel| 179
un BEAR able
10/02/2024| Posted in Colouring Stamped Images, Copic Colouring, Die Cutting, Fussy Cutting, Patterned Papers, Stamping| 257
Sew Cute Mini Notebook & Card
19/02/2024| Posted in Pencil Colouring, Die Cutting, Card Making, Stencilling, Gift Making, Layering Stencils, Stencilled backgrounds, Flashback Friday Bargains| 150
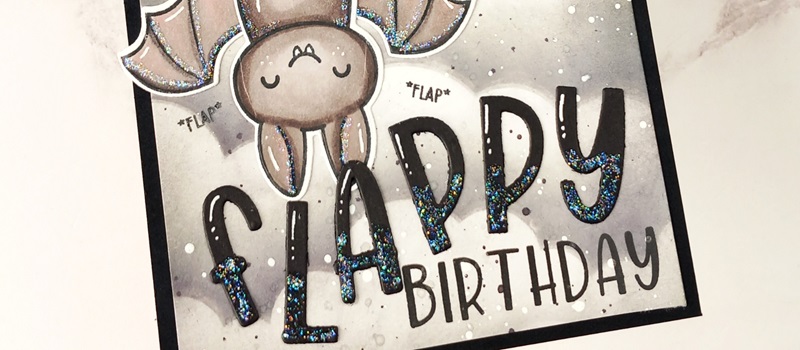
Grungy Flappy Birthday
20/02/2024| Posted in Colouring Stamped Images, Copic Colouring, Die Cutting, Ink Blending, Card Making| 164

Big Contempo Birthday Vibes
23/02/2024| Posted in Die Cutting, Stamping Techniques, Card Making, Stamped Background, turnabouts, sentiment Focal Points| 196

Simple Mandala Card
26/02/2024| Posted in Colouring Stamped Images, Copic Colouring, Card Making, Stencilling, Clean & Simple, Stencilled backgrounds, Clean and Simple (CAS)| 169
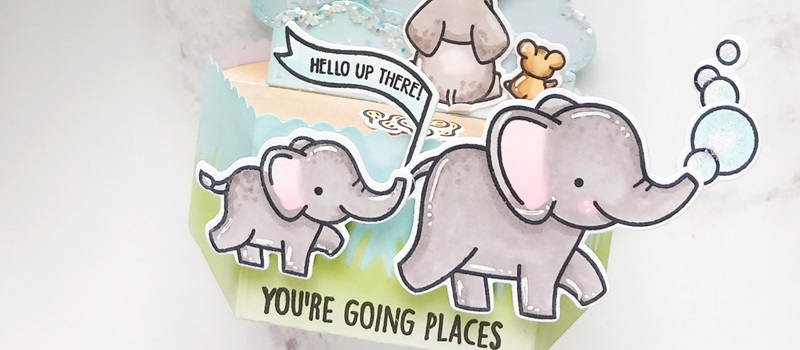
You're Going Places...
27/02/2024| Posted in Colouring Stamped Images, Copic Colouring, Die Cutting, Ink Blending, Card Making, Stencilling, 3D| 211
I Hope You Know...
07/03/2024| Posted in Stamping Techniques, Card Making| 585
A Sweet Duo
14/03/2024| Posted in Colouring Stamped Images, Die Cutting, Stamping Techniques, Card Making, Stencilling, colouring die cuts| 220
One panel two ways
17/03/2024| Posted in Die Cutting| 234
Sweet Hello
21/03/2024| Posted in Die Cutting, Card Making, Partial Die Cutting, Stencilling, Stencilled backgrounds| 199
You Are Amazing!
02/04/2024| Posted in Die Cutting, Stamping Techniques, Card Making, turnabouts, Inlaid Die Cutting| 139
It's a Wrap Posy
08/04/2024| Posted in Die Cutting, Card Making, Stencilling, Patterned Papers, Clean & Simple, Clean and Simple (CAS)| 160
Sending Hugs & Snuggles
09/04/2024| Posted in Die Cutting, Ink Blending, Card Making, Stencilling, Stamping, Embossing Folders| 176
Bouquet Wishes
10/04/2024| Posted in Die Cutting, Card Making| 193

Birthdays and Backgrounds
14/04/2024| Posted in Die Cutting| 228

Paper Bouquet
17/04/2024| Posted in Die Cutting, Card Making| 178
Paper Bouquet Take 2
24/04/2024| Posted in Die Cutting, Card Making| 182
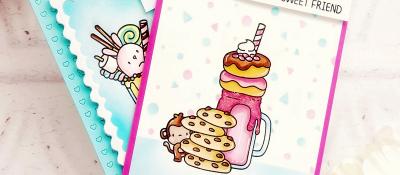
Cute Milkshake Card
22/04/2024| Posted in Water Colouring, Card Making| 111
How to add dimension to your projects!
23/04/2024| Posted in Die Cutting, Ink Blending, Card Making, Stencilling, Stamping, Layering Stencils| 132
Simple Birthday Card
06/05/2024| Posted in Die Cutting, Ink Blending, Card Making, Stencilling, Stencilled backgrounds| 155
Award Winning
08/05/2024| Posted in Die Cutting, Card Making| 160
Breakthrough Butterflies
12/05/2024| Posted in Die Cutting, Foiling| 164
Party Hat Fun!
15/05/2024| Posted in Die Cutting, Card Making| 152
Lawn Fawn in the Desert
16/05/2024| Posted in Pencil Colouring, Masking| 128
Bridgerton Buzz
22/05/2024| Posted in Card Making| 174
Summer Houses
19/05/2024| Posted in Die Cutting| 131
Soft Botanicals
29/05/2024| Posted in Card Making, Stencilled backgrounds| 117

Birthday Megaphone
26/05/2024| Posted in Die Cutting| 135
Sweet Treats
28/05/2024| Posted in Colouring Stamped Images, Copic Colouring, Die Cutting, Card Making, Interactive Cards| 85

Farmyard Happy Birthday
03/06/2024| Posted in Pencil Colouring, Die Cutting, Card Making, Stamping, Clean & Simple, Clean and Simple (CAS)| 109
Mini Birthday Wishes
05/06/2024| Posted in Die Cutting, Card Making| 195
Mondrian Inspired
06/06/2024| Posted in Copic Colouring, Stamping Techniques, Card Making, Stamped Background, Fussy Cutting, turnabouts| 139


Creating A Slimline Scene With Whoosh Kites Stamp Set
25/06/2024| Posted in Colouring Stamped Images, Die Cutting, Ink Blending, Card Making, Stencilling| 52
Beautiful Waffle Flower Butterflies
27/06/2024| Posted in Die Cutting, Ink Blending, Card Making, Stencilling, Clean & Simple, Stencilled backgrounds| 66
Related Products

Controversial Santas
28/08/2022

Birthday Forecast
14/02/2022

Encouraging Leaves
15/03/2021

Framed Snowdrops
22/02/2021

Beautiful Waffle Flower Butterflies
27/06/2024
Extend Your Stamp Sets with Zentangle
24/06/2024

Flashback Friday Bargains - Sports Edition
21/06/2024